layout: page title: “Python Installation for Data Science - Overview” permalink: https://coding-dojo-data-science.github.io/dojo-env-setup parent: Instructions ___
Python Installation for Data Science - Overview
- Click here for the web version of these instructions.
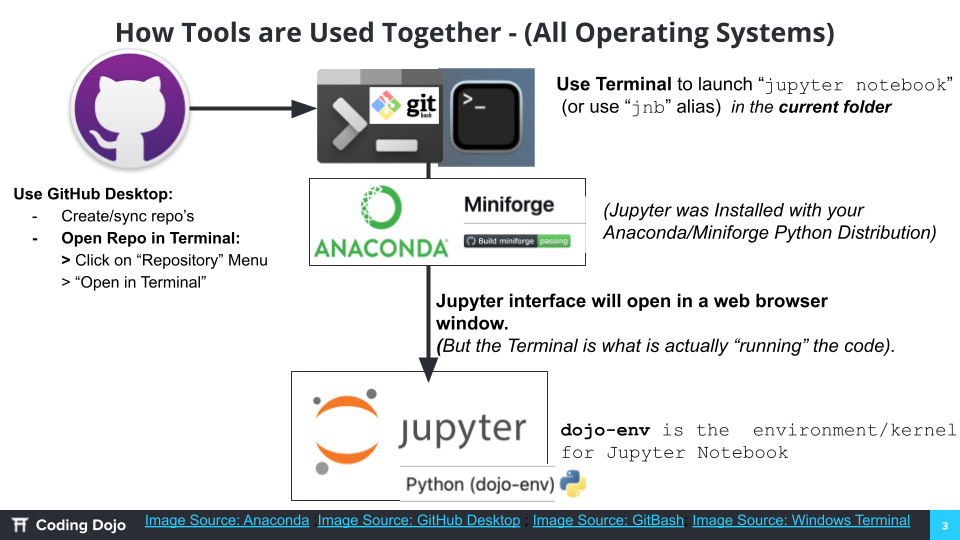
So far in this program, you have worked in Google Colab, which provides a cloud-based coding environment.
- We will transition to using a Python environment stored on your local machine.
- Jupyter Notebook will replace Google Colab.
- GitHub Desktop will sync your work. ___
Installation Timeline/Deadline
- In the Data Enrichment course, you will need to submit a CORE ASSIGNMENT containing the error-free test notebook that is included within these instructions. This will ensure that you have the tools you will need to be successful.
- We recommend you begin the step-by-step installation AS SOON AS POSSIBLE to ensure you have time to troubleshoot any difficulties you may encounter.
-
These steps should take ~30-90 minutes, depending on the speed of your machine and internet connection.
-
If you run into issues during installation, see the “How to Ask for Help” secton at the bottom of this page.
- The dojo-env-setup repository, which you will clone in Step 2.1, contains a backup copy of the entire set of instructions on the README, for convenience.
Note: if you previously installed the dojo-env and are upgrading to the current version, please see the “Updating to New dojo-env” instructions
Installation Overview:
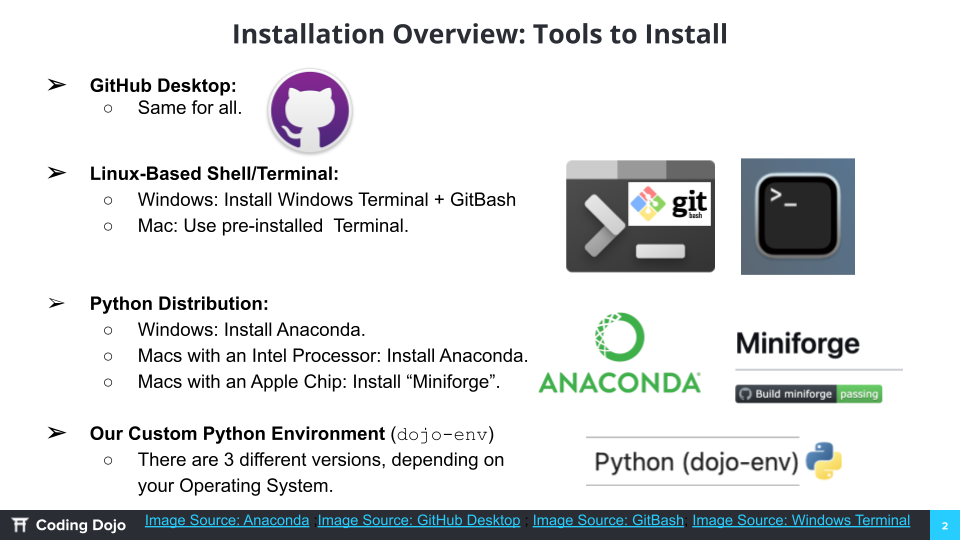
By the end of this installation, you will:
1) Install or Set Up a Terminal application:
- The terminal is the primary application you will use to execute programming commands.
- Mac and Linux users should already have a Terminal application installed.
- Windows users will install additional software (Windows Terminal + Git for Windows)
2) Install a Python distribution:
The foundation/infrastructure for installing our custom Python environment.
- Windows and Intel-Macs will install Anaconda.
- Apple Chip Macs will installing a lightweight alternative called miniforge.
3) Install GitHub Desktop
- Desktop application for working with and managing git repositories.
4) Create our custom Python environment (dojo-env)
- An environment is a bundle of specific versions of python packages that are mutually compatible.
- We will install our custom
dojo-env` Python environment, located in the dojo-env-setup repository.
5) Test & customize the environment using Jupyter Notebook
- Jupyter Notebook will replace Google Colab on your local computer.
6) Install Visual Studio Code as a secondary code editor.
-
A special text editor designed for code. It has many extensions and languages available.
-
We will use it to edit special files later in the course, but it can also run notebooks too!
OS-Specific Instructions
Please make sure you select the correct instructions page, based on your computer’s operating system!
Supported Operating Systems
We have prepared environment files (.yml files) for 4 different OS configurations:
- Windows (10 & 11)
- Mac (with Intel Processors)†
- Mac (Apple Chips)†
†Mac users - if you don’t know which type of Mac you have :
Check the “About this Mac” screen for your computer:
-
Click on the Apple symbol in the top-left corner of your screen > Click “About This Mac”.
-
A window with your computer’s specs will appear like the one in the screenshots below, depending on how which version of macOS you have installed.
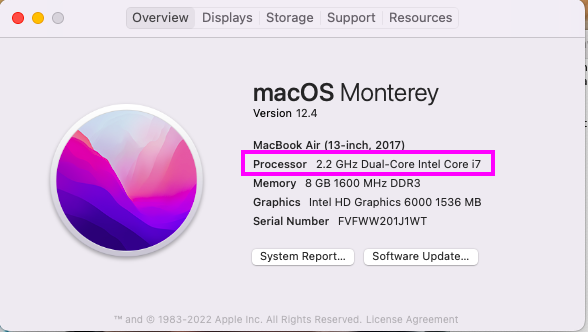
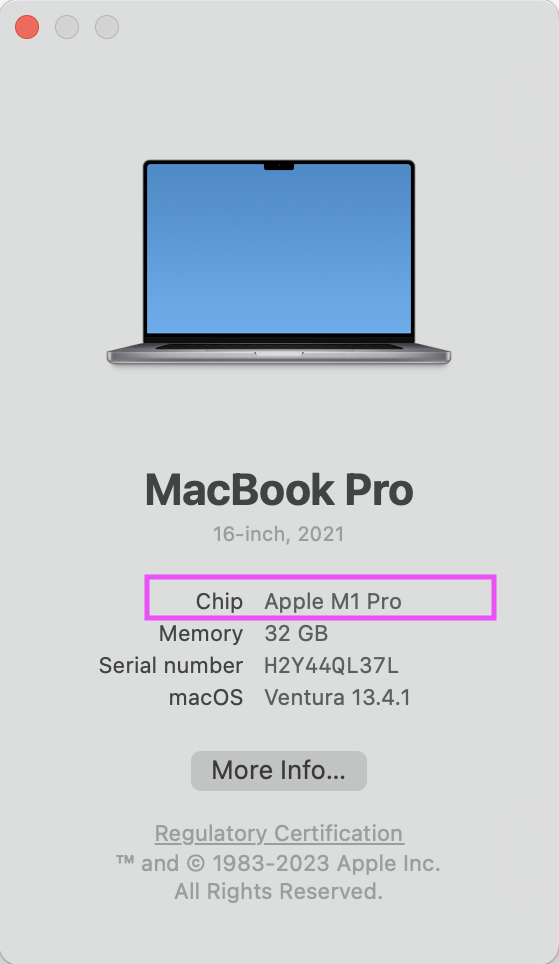
-
If it has a “Processor” line that says “Intel” you should follow the Instructions: Mac (Intel Processor).
-
If it has a “Chip” line that says “Apple” then you should follow the Instructions: Mac (Apple Chip).
Installation Instructions Pages
Please review the How to Ask for Help Section At the Bottom of this page if you get stuck!
For New Installations:
For updating Pre-Existing Install:
How to Ask for Help
If you encounter an error during installation: You may continue to work through the first half of the data enrichment week 1 lessons & assignments while troubleshooting your local installation! The first lessons and assignments can be completed using Google Colab.
-
First, read a little further down in the instructions to make sure we do not already address the error message that you ran into.
-
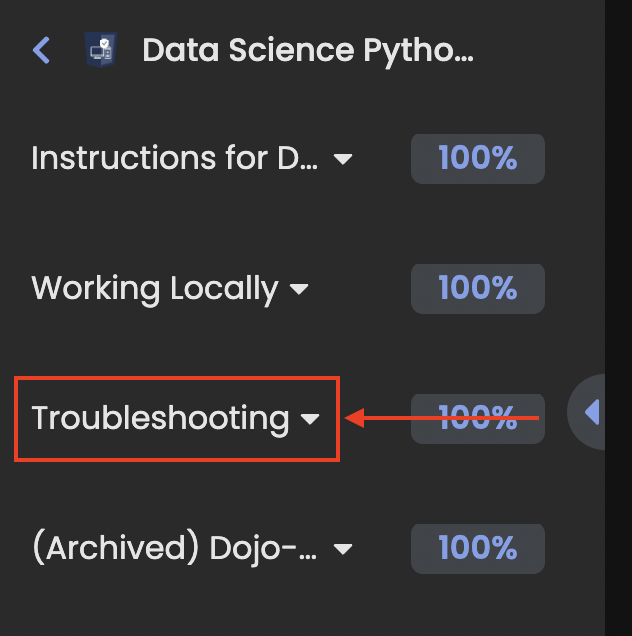
Second, please check the “Troubleshooting” chapter on the learnig platform for a lesson that mentions your problem. about the problem you are running into. (The Troubleshooting section is the 3rd chapter in this course - see the screenshot below)
-
Third, reach out on the #ds-python-installation Discord channel with the following info:
- A) Which step are you on? (e.g. Step 2.3.3 Confirm the env was created)
- B) Which OS you are using (e.g. Windows 10, Windows 11, Mac with an mchip, Mac with an Intel processor, etc.)
- C) Let us know if you’ve previously installed an older version of Python.
- D) Attach your copy of the environment tester notebook and the FINAL_REPORT.txt files.
- E) Include any additional screenshots of the error/issue you are running into, whenever possible.
- F) Add any additional details or info you think may be helpful for us to know.
- For example:
- “My computer is really old and I think that may be part of the problem.”
- “I share this computer with someone else who also uses python”
- “This is my work computer and I am not an administrator.” etc
- For example:
-
Fourth, if you do not receive a response by the end of the day on Discord, please email your instructor with the same information.
- An instructor or TA will get back to you within 1 business day with the next steps for you to try.
- You will most likely need to set up a Zoom call and share your screen for us to help.
Now, navigate to the correct instructions page, based on your operating system, as explained above:
APPENDIX
Links of Interest
08/23/23 Note: Switch to the
v2023branch in the dojo-env-setup repo in GitHub Desktop for the correct env files.
Reference: Helpful Commands
Installation Commands
- To activate dojo-env and add it to Jupyter (after installation)
conda activate dojo-env
python -m ipykernel install --user --name dojo-env --display-name "Python (dojo-env)"
- To re-add
condacommand:
# Generic command (doesn't always work)
conda init

# Windows
conda init  bash

# Mac
conda init zsh
Uninstall commands
Uninstall dojo-env
- To remove the current dojo-env:
conda activate base
conda remove --name dojo-env --all
- Then answer
yfor yes
Setting Default Env
For Mac Users (using the default terminal - zsh)
touch ~/.zshrc
echo "conda activate dojo-env" >> ~/.zshrc
echo 'alias jnb="jupyter notebook"' >> ~/.zshrc
echo 'alias lab="jupyter lab"' >> ~/.zshrc
For Windows Users (or mac users who switched to bash)
- To set dojo-env as the default Python env and add Jupyter shortcuts
Note: you may need to replace ~ with the full path to your user folder. (e.g. “/Users/codingdojo/.bash_profile” instead of “~/.bash_profile”)
touch ~/.bash_profile
echo "conda activate dojo-env" >> ~/.bash_profile
echo 'alias jnb="jupyter notebook"' >> ~/.bash_profile
echo 'alias lab="jupyter lab"' >> ~/.bash_profile
Managing Jupyter Kernels
- To see the list of kernels that jupyter will display as options:
jupyter kernelspec list
- To remove a kernel that no longer exists (replace
<kernel name>with name of kernel from the jupyter kernelspec list command ):
jupyter kernelspec remove <kernel name>
# Example:
jupyter kernelspec remove dojo-env-old